Pages

Tuesday, March 23, 2010

How Can I Build a Window in Vectorworks With A Sloping Bottom?

A sloping top is easy, but a sloping bottom requires more work. A sloped top can be made with a window object or a WinDoor object. But that does not answer our problem.

The answer is that we need to make a symbol for the window. We will not be able to use a standard object to make our window.

Here is our situation. We want a window between the 2 roofs.


If you change your view to look directly at the wall it becomes easier.

The upper part of the window has to follow the upper roof and the underside of the window has to follow the lower roof slope.

Draw lines on the roof edges and offset them. This makes guides to draw with.


Use the polygon tool to draw the outline of the window.


Offset the polygon.
Make a copy of the inner rectangle.
Exrtude the outer polygon 120mm
Extrude the first inner polygon 125mm
Extrude the second inner polygon 10mm.


Move the extusions in 3D so that they are in the correct locations.


Use the Subtract Solid... command to subtract the smaller polygon from the bigger one. This will make a window frame if you get it the right way round.


In plan view move the glass so that it in the right place.
Select the window frame and glass.


Make the window in to a symbol.

Place the symbol in the wall.


This can be done really quickly. One of the tricks to look out for is to set your view correctly. This makes all the other steps easier if you get this correct.

These notes were one of my Short Sharp Training (monthly) manuals. Each month my subscribers get a full interactive PDF manual covering an important topic in Vectorworks.

Subscribe now!

Saturday, March 20, 2010

Vector-workout Guide to Residential Concept Design 2010

Many of my clients want to use Vectorworks just for conceptual design. This means that the users often want a cut-down Vectorworks interface that just shows the tools they want, to make it faster to draw. Often these users do not want to draw the walls of the building, they want a quick way of modeling the building, a way to see the building on the site, and they want to be able to check the building with a solar study.

What they don't want is a long course that covers all 2D drawing, followed by a long course that goes into loads of Architect tools.

In response, I have made a Vector-workout Guide to Residential Concept design. Like all the Vector-workout manuals, this one is movie based. If you do not like too much reading, this is the manual for you. The manual contains over 40 movies, with a total running time of over and 1.5 hrs.

I have kept these notes as concise as possible, so you just get the important stuff.

We start with customizing Vectorworks. This is to get rid of all the tools and commands that are cluttering up your screen and making it hard to see the tools you really want.

Then, we set up our document. We need to get the page size, dimensions and layers set up correctly. If we make a good job of it, the file can be saved as a template to use again and again.

Creating rooms using space objects is really useful. Spaces can report the name, actual area, proposed area and so much more. Spaces are 3D in objects that can be color-coded to help you and the client understand the concept.

If space objects don't give you the shapes and forms you want, you can use some of the simple 3D modeling techniques.

We will create a site in 3D using Site Modeling. Site modeling is better for a building site because it creates contours, allows you to move objects to site on the site and allows you to cut and fill the site. When the site is completed we will connect the concept model to the site and quickly draw the adjoining buildings.

Visualization is important. We will look at setting 3D views and manipulating them. We will not be looking at all the 3D view options, just the best ones. We will also look at a solar study of the project, and a solar animation that will show our project from sunrise to sunset.

Finally, we look at taking the concept model to the next stage using simple walls, doors, windows and roofing.

I'm really excited about this manual, here is my introductory movie from the manual.


Buy it this button, or from novedge.


I have developed an online course around this manual. The online course is only 6 (1hr) sessions, and could easily be completed in 2 or 3 weeks. So see details of this course please visit this web site.

Friday, March 19, 2010

Amazon Announce Kindle for Macintosh Application

At last! We can now get kindle books on the Macintosh.

For a long time I have been trying to read ebooks. I've tried a psion, Palm (many sorts) and the iphone. They are all so small, you can't see the words. The iphone has been a big improvement on this, because you can make the text bigger, and the screen is bigger. But still, who wants to read a book with only a few line on each page. You spend all day turning pages. Even a small book ends up with thousands of pages.

The Kindle looks different. First, it's big. So much bigger than the iphone and nexus. That on it's own is probably the best part. But are there any good ebooks out there?

I read a lot of business books, books like:
Cheap: The High Cost of Discount Culture by Ellen Ruppel Shell
Free: The Future of a Radical Price by Chris Anderson

I have a large number of books, because I like to read. So would it bee nice to have hundreds of books in my Kindle instead of on the shelf. Yes, it think it would. You could close the business book and open the fiction story.

I see that many of the books I want to read are not in the Kindle store yet, but I see more and more appearing every day. I see the ebook as the way head.


I'm hoping that when I get my Kindle, ebooks will feel like a read book, but I will be able to carry all the books I want, with out the storage problem.

How does this help if you want to learn Vectorworks? I have started to convert my short sharp manuals to Kindle format:

Quickstart Guide Vectorworks 2010
Stacked Layers/Unified View and Setting up layers in Vectorworks
Irrigation Tools in Vectorworks 12-2010

These could be stored in the Kindle, and used on your desk as a Vectorworks training resource. I also noticed that you can copy PDF from your computer to the Kindle. This would allow you to copy my monthly manuals from my subscription service. and keep them in the kindle for when you want to access them. The Short Sharp Manuals from my store could also be copied to your Kindle.

Monday, March 15, 2010

Introduction to Customising VectorWorks

Introduction

VectorWorks works really well, but if you edit the workspace, and customise the arrangement of the tools and menus you can work faster and happier. We will learn how to edit the workspace and add commands to the right mouse button.

VectorWorks also has a built in programming language called VectorScript  that lets you make your own tools and commands. We will learn how to do some basic programming and learn how to start to make your own tools and commands.

Why Change VectorWorks?
The program as it comes out of the box is designed by someone else, it was not designed by you.  They have made assumptions about the way they think you will work.  They could be wrong, there could be better ways for you to work.  Customising VectorWorks is a way that you can change the program to suit you.  The aim is to make VectorWorks easier, faster and more enjoyable to use.

To add new tools or commands to Vectorworks, you have copy the plugins to the Plug-ins Folder of you VectorWorks application folder. 

Locate your new tool or command.
Right mouse click (control+click) on the tool or command.
Choose Copy.
Go to the Plug-ins folder of your  VectorWorks application folder.

Right mouse click (control+click).
Choose Paste.
On a Windows machine Plug-ins will be in the Program Files.
On a Macintosh the Plug-ins folder will be in the Applications folder;

You can download extra Plug-ins for VectorWorks from several internet places, and you can make your own. To use them, they must be copied to the Plug-ins folder of your  VectorWorks application folder.

Workspaces

Workspaces is VectorWorks’ way of describing the combination of menus and tool palettes.  When you start VectorWorks you get two workspaces, the standard Workspace and the Workspace for your profession.

From the Menu Bar choose File > Workspaces > Workspace Editor.  
If you choose to create a new Workspace it has nothing in it and you will have to add everything.  The easiest way to start a new Workspace is to edit an existing Workspace.  

Choose to edit a copy of the current workspace.  Do not edit your original Architect (or profession), or Standard Workspace because if you mess it up you will have nothing to go back to.  

The edit Workspace dialog box opens.

On the left hand side is a listing of all possible menu commands that you can install.  On the right hand side is a list of the menu commands that are in your current workspace.
Create a New Menu

Go to the left hand side and select the New Menu.

Hold the mouse button down and drag the New Menu across to the right hand side.

Move your cursor between the Text and Window.  A line appears to show you that VectorWorks will insert your new menu between the View Menu and the Window Menu.  

Let go of the mouse button.

Click on the New Menu, it will highlight.  
Change the name of the new menu to Utilities by typing in the name.


Adding a Menu Command
To add a menu command,  find the command that you want to add.  

Click on the command and hold the mouse button down.

Drag the command over to the right hand side and move your cursor to the new Utilities menu.
Notice that there is a black line and an arrow where the new command will be inserted.

Release the mouse button.

The new command will be in the Utilities Menu.


This is an exert from my Short Sharp Training (monthly). Each month subscribers get a manual like this on a range of topics.

Subscribe here.

Sunday, March 14, 2010

Introduction to 3D Modeling - Layers for 3D Modeling

Introduction to 3D Modeling
Before you can do any sort of complex 3D modelling you have to understand some of the basic 3D modelling concepts. That’s what this workshop is all about, learning the simple 3D stuff that you need to learn in order to make your 3D stuff.


Often when I am teaching I hear people say, “well, I’ll get the 2D stuff under my belt first and then I’ll get into the 3d Stuff”. One of the things that this tells me is that I haven’t explained the way the VectorWorks is designed.

VectorWorks is designed to be a simple 3D modeling package and if you draw buildings using the wall tool then you are drawing 3D information. If  you use door and window plug-in objects then you are creating 3D information. If you use the VectorWorks roof tools then you are creating 3D information. These things are created for you as you draw.

If you set up the layers correctly then you get walls at the right height, the roof sits on the walls and you can use the 3D model (which was almost created free of effort) to generate the elevations and sections. VectorWorks is designed to make this easy.

The first part of this manual will cover how to set up the layers correctly to  draw the walls, doors and windows.

Layers for 3D Modeling
It’s important to understand how to set a your files to make 3D easy for you. If you use your existing default file it will probably be set up for just 2D use. While this does not stop you creating 3D elements in it. 3D elements can be created in any layer, it would be easier to have your layers set up for 3D work.

However, if you want to create a 3D model then it pays to set up the file at the beginning to accommodate the file. It will make fast and easy to generate the 3D model.
Layers are a horizontal organising method where you can divide your file in to horizontal chunks. These horizontal chunks also have a height and if you set up their heights carefully you can generate your 3D views easily.

From the Menu Bar choose
Tools > Organization...
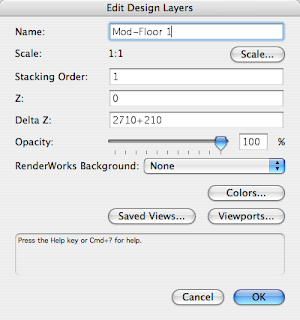
Double click on a layer to edit it.

The Edit Design Layers dialog gives you the opportunity to set up your layers with 3D heights. The Z height and the delta Z are the places where you  set up the heights of each layer.

The Z for the layer is the project height to the bottom of the layer. The delta Z is the height of the layer, its thickness.

Layers do not have to be stacked neatly on top of each other and more than one layer can occupy the same space. There could be a gap between the layers if you wanted.

3D objects don’t have to stop at the top of the layer, they can go beyond the delta Z height. You could say that the top of the layer is a conceptual top not an actual top.
Using Project Levels for the Layer 
You can use the Project Levels (RL) for the setting out of the layers but there are some things that you need to watch out for. When the RL’s are large, say over 20m then when you go to a front view of the building it is so high on the page, you’ll think that it is not there. If the levels are too high the front view will go out of the printable area.

So there is a better way. That is to decide to set one of the FFL’s as z=0 in the Layer Setup. Then all the z heights in the file are relative to this height.


Setting up the Layers
To set up the layers for the project you need to have some idea of the construction and setting out. For example if the construction is 2710 high from the underside of the bottom plate to the topside of the top plate. The floor thickness will depend on the project, depending on the floor joists that you use. For this example the joists are 200x50 with 20mm particle board on top. The construction of the top floor is 2440 from the underside of the bottom plate to the top of the top plate.


On the Organization dialog box the Mod-Level 1 layer will be set up so that it goes from the underside of the bottom plate (top of slab) to the underside of the bottom plate on the Mod-Level 2 (top of the floor). I find it easy to set up the layers from FFL to FFL.

Door and Window Objects
When you place a door, a window or a windoor object, you have the option to put in the height and width of the object. That is you get the change to put in the 3D dimensions of the window or door.

Take advantage of this because it makes it easy to use the model that you are making for elevations and sections.

after you have placed the window or door in the drawing you can edit the 3D portion of the door using the Obj Info palette.


This is an exert from my Short Sharp Training (monthly). Each month subscribers get a manual like this on a range of topics.


This is an exert from my Short Sharp Training (monthly). Each month subscribers get a manual like this on a range of topics. Subscribe here.

The full manual is now available at the Amazon Kindle bookstore. You can view kindle books on your iphoneblackberryPC and Mac, check it out here. 

Saturday, March 13, 2010

short Sharp Training Monthly - Irrigation tools

Introduction
Vectorworks has several irrigation tools. There are tools for placing sprinkers, pipes, and drip emitters, and there are worksheets for counting these objects.

The irrigation tools are only available if you have Vectorworks Landmark. But what if you have Vectorworks Fundamentals, Architect, or one of the other Vectorworks packages? You can’t use the irrigation tools, but you can build symbols that replicate the sprinklers and drip emitters. They will not be as flexible, but it is a workaround. We will cover these later, after looking at the Landmark tools.

Irrigation Heads
The irrigation head tool is used to place your sprinklers. This tool creates a 2D object that shows the head and spray pattern. It does not create a 3D version, although with Vectorworks 2010 you can see the spray patern in 3D, but only if you layer plane.

Because the object is 2D only, you can’t use the Send to Surface command to see the irrigation head on your site model, the planar graphics always have the spray pattern on the bottom of the layer.
In earlier versions of Vectorworks the spray pattern is 2D only, and you can not change it.

Go to the Site Planning Tool set.
Choose the Irrigation Head tool.


Go to the Tool Bar.
Click on the Preferences... button, the last button on the tool bar.

This dialog box controls all the settings for the Irrigation Head.
Fill in the dialog box to suit the Irrigation Head you want to use.
Click on the OK button.


Move your cursor into the drawing area.
You should notice a ghost image on the cursor. This is your Irrigation Head.
Move your cursor to the centre position for your first Irrigation Head (sprinkler).
Click once.


The next click controls rotation.
Move along the edge of the object you want to use. 


Click once.
This has positioned the Irrigation head (sprinkler).


Move to the next location.
Click once.


Move your cursor to set the rotation.
Click once.


Place the other sprinklers you want.


This is an exert from my Short Sharp Training (monthly). Each month subscribers get a manual like this on a range of topics.

Friday, March 12, 2010

Why Invest in Vectorworks if You Won't Learn How to Use it Effectively?

I have been chatting to my friend Bill. He was telling me about several of his clients that have bought Vectorworks, but are not willing to invest in training. That's like buying a car that you can't drive.

Vectorworks is a sophisticated program, there is so much you an learn about it. The difference between being self-taught and learning from a trainer could be the difference of an hour a day when you are up to speed. So, you could save yourself a day a week if you used the training resources that are available.

Some of my manuals look expensive, but if you were having trouble with roofs for example, you might find the answer in my manual within a few minutes, saving you a few hours of trial and error. Those saved hours would easily pay for my most expensive manuals.


Another example is learning correctly, from the beginning. I have some users at my 101 Landmark course this week. They are learning the correct way to get started, the easy way to draw landscapes. To get started well makes it easy to use vectorworks forever, and it makes Vectorworks fun. Attending a course is the easy way to get started, someone watches you to make sure you are
learning correctly.

It's Never The Right Time To Start Your Vectorworks Library

I've been chatting to a client over skype today. We were talking about making a Vectorworks library. My client was talking about how he has finally started to make his Vectorworks library, even though it is not the right time. I think that it's never he right time to start your Vectorworks library, but you have to start it anyway. If you wait until the right time, you will be waiting forever.

Do not wait until you have all the symbols you need, that will never happen, because you will always be need more. Building technology changes, client requests change, you change. So, do not wait.

There are so many parts to the Vectorworks library. In the past, you used one file to build your Vectorworks library. All your hatches, gradients, symbols and so on would be stored there.  You could add this your Resource Browser as a favorite.


Vectorworks now uses a folder to store default content. Hatches are stored in one place, gradients in another.

This might not seem a good idea, but it really does work well. When you use the Attributes Palette to assign a hatch, Vectorworks looks in the hatch default folder and shows you all the hatches it finds. this makes it easy to assign the hatches from your library.


So, the answer is to get started now. Make a library, even a bad one. It will make you more efficient than no library.

The notes my client was reading are still available at this web site.

Sunday, March 07, 2010

ebook For Sale - Vectorworks Irrigation tools

I've been looking at ebooks for a while now, and I have started to create ebooks for sale. I wonder if ebooks are going to be a better way to deliver Vectorworks manuals online. The ebooks contain instructions and screen shots. In A5 format (about half a letter size), this manual has about 60 pages and 70 screen shots.

I have posted an ebook about using the irrigation tools in Vectorworks Landmark for version 12-2010. You can purchase the manual at lulu.com If you have a kindle the manual will be available soon. Just search for Vectorworks at the Kindle store.

Support independent publishing: Buy this e-book on Lulu.

Clicking on the link will take you to a web site to purchase the manual.

Thursday, March 04, 2010

Free Vectorworks Training on Irrigation

Each month I offer free training so you can try out my online user group, Short Sharp Training. This month we are looking at the Irrigation Tools for Vectorworks. There are tools to add irrigation heads, drip emitters and irrigation lines. There are also way to report these. So, we will be looking at these tools.

But what if you do not have Vectorworks Landmark? Well, there are other ways, some people say better ways, of creating irrigation. So, we will be looking at this other way to create your irrigation plan and how to schedule the total length of irrigation pipe, sprinklers, drip emitters, risers and junctions.

Date: Wednesday 10th March NZDT (use this to convert to your time zone http://www.timezoneconverter.com/cgi-bin/tzc.tzc

Location: online, so it is at your computer. You will need a headset with mic.

Cost: Free

This training will suit all levels of Vectorworks user, I will be explaining the concepts as I use them. The Training is limited to 20 people, so if you want to learn about this, please email me at jon@archoncad.co.nz

Wednesday, March 03, 2010

Vectorworks Manuals on Your iPhone


I am really excited to see my monthly manuals on my iPhone. I found an application you can buy from the iTunes Application store for viewing PDF files called PDF Reader Pro, which you can buy from http://www.yuyao.com.tw/pdfreader.html


The reason I like this app, is that you can use WIFI to upload files to your iPhone. This means you can read your PDF files when you are off line. It means you do not have to download the PDF file each time you want to view the file.

Using this app, I was able to see my Short Sharp Training on my iPhone. If you are a subscriber, you would have noticed that the new manuals are formatted in A5 format (about 1/2 letter size). Formatting the manual this way means there are more pages, but it also means that the manuals appear really well on the iPhone.

I can't wait to see this on a bigger format device like a kindle or iPad.

Now, if you do not want to buy this app for your iPhone, you can use other methods.

One way is to copy the PDF file to iDisk . This will allow you to view the PDF online, but it will force you to download the file each time you want to view it.

Another method is to use DropBox . Dropbox is an online storage system.

You can set up a folder online, and then copy any files you want to it.

This will allow you to view the PDF online, but it will force you to download the file each time you want to view it.

If you are not a subscriber, you can join here.

Vectorworks 2010 Tutorial Manuals on Windows 7

I have just had an email from a client using Windows 7. He was having trouble seeing the movies I've embedded into the pdf copy of the manual. This is not unusual if you do not open the PDF with Acrobat Reader. Normally this affects Macintosh clients, because they have a habit of double clicking on the PDF to start. 


The solution on a Macintosh is to right mouse click (control+click) on the PDF and choose Open With... and then choose Adobe Reader. 


The solution is similar on window 7. Here is my reply from the client:
1. Insert the disk into the disk drive. On my computer, with windows 7, I go to the windows icon and select "computer". The selections change and there is an "eject" option.  This opens the drawer to the Disk Drive.
2. I insert the disk and after a bit of spinning I am given a menu of choices so I select "Open Folder to view files".
3. At this point a screen entitled Paper Port opens. On the left is all my computers files and on the right a big screen showing a page from your manual and the sub title or file name that is Essential_Tutorial_Manual_2nd_Edition.
4. Now I right click (not double click)this file and an option screen appears which allows me to "Open".
5. At this point after a bit the file is opened in ADOBE. AN NOW IT IS SHOWING YOUR MOVIES JUST FINE.

Using Stacked Layers/Unified View

Stacked layers and Unified View allow you see all your layers together, so when you change views, all the layers change. But there are some things to watch for, like the 2D stuff.

Setting up your layers correctly is essential is you want to use Vectorworks for BIM, and if you want to use Stacked Layers or Unified View.


Stacked layers was a new technique introduced in Vectorworks 2008. Before Vectorworks 2008, if you wanted to see a complete view of your project, you would make a new layer for 3D viewing. Then you could layer link all your design layers to the 3D model layer. In order to view your model, you would change to this layer and make all the Layer Options Active Only. This would be the place to set up views for rendering, creating elevations and so on.

With Vectorworks 2008 and 2009, you do not have to set up the 3D model layer. Stacked Layers allow you to see all the visible layers in your file, and when you move the view around, all the layers look like they are joined together. Vectorworks uses the layer Z height to get all the layers to set correctly in 3D.

This is the normal view of a building when you change the view. One layer has the correct view, the other has remained in isometric. When you change views, both layers do not change together.
The answer is to use Stacked Layers.

Go to the View bar. This is one place where you will find the Stack layers .

The other place to find Stack Layers... is on the View menu.

When you turn on Stack Layers, all visible layers change to the same view. If you change the view, all the visible layers show the same view.


Go to the Menu Bar.
Choose View >  Stack Layers Options...


    You can set the options you want.

    The top option controls the look of all the 2D objects. If you turn this option on, all the 2D objects are shown.Notice all the dimensions, they can get in the way.


    Try turning off the Display 2D objects option.


    For visualization, this is a better option. The model looks a lot cleaner.

    You will find it difficult to work with stacked layered turned on, there are some things that do not work, like you can’t use Show/Snap/Modify others for the layer options, and all of the 2D tools don’t work.
    You will find yourself turning stacked layers on, just for visualization. You will have to turn Stacked Layers off to work.


    Many users struggle with setting up their layer heights correctly in Vectorworks. This Short Sharp Manual will help.

    You can purchase this manual at this web site:
    http://www.archoncad.com/electronic-manuals.html