Pages

Monday, November 29, 2010

Vector-workout Support Subscription

What is the Vector-workout Support Subscription service?
Every month you get:

  • A PDF manual that covers a task
  • Movies linked to the manual
  • extra tips and tricks movies
  • online workshop sessions
  • private blog with tips and tricks
What makes this different from the service offered by Vectorworks?
I have been offering this service since January 2007, so I have covered a lot of topics. My aim is to teach, not to sell Vectorworks, so I approach the topics from a different point if view. My support service does NOT include the upgrade portion.

Subscribe Now!


PDF Manual
This manual usually covers a specific task or topic. In the past we have covered topics such as: creating a solar study, rendering and Introduction to Annotation. These manuals assume you have limited knowledge of Vectorworks, so they start at the beginning, and show you all the steps you need, along with screen shots (on average over 100 images/manual).

Movies
As well as the screen shots in the manual, there are movies linked to each exercise in the PDF manual. If you do not want to read the manual, you can click on the linked movies a watch the exercise being carried out.

Extra Tips and Tricks
The extra tips and tricks are extended podcasts, short movies that show extra techniques that might be useful. Normally, these movies are designed to show you an different area of Vectorworks than that covered in the PDF manual.

Online Workshop Sessions
Each month you have the change to attend an online session with others. The sessions are interactive, allowing you ask questions, and allowing other attendees to share their experiences. Sharing your Vectorworks experience. or learning from others is invaluable. There are a range of session times to suit users from all over the world.

We have just introduced expert sessions. These new sessions are for users that know much of the basic use of tools, but really want to get into the details.

Private Blog
Many times, I see a small trick, or I need to write an answer for a client. Until recently, I may have made these a public blog with only limited instructions. In the future, these blogs will be fully illustrated with complete instructions. Only my subscribers will be able to access these blogs.

3D Modeling Course for Vectorworks 2011

Are you struggling with 3D modeling in Vectorworks 2011? Would you like to unlock the speed and power of 3D in Vectorworks? Then this is the course.


3D is the really fun part of Vectorworks and if you understand the 3D area and the tools, you can create fantastic models really quickly.

This course will uses several exercises designed to show you how each tool or command works.

Session 1
We start at the beginning with 3D basics:
Working plans
Extrusions
Multiple extrusions
And how to break up a model into manageable chunks.

Session 2
Simple 3D modeling and complex curving shapes:
Add solid
Subtract Solid
Loft Surface
Push/Pull tool.

Session 3
Other 3D tools and concepts:
3D Primatives
Shell Solid
Extrude Along a Path
Creating a Surface from Curves.

Session 4
Architectural modeling without using walls or roofs.

This course is closely based on the first part of the Vectorworks 3D Tutorial Manual available from http://www.nemetschek.net/training/guides.php


See calendar...

Cost $120US (does not include manual)


Pay for this course with Paypal.

Friday, November 26, 2010

How Much Should be in a Free Blog?

I have been writing blogs for a few years now. I have noticed lately that I am getting a lot of views on this blog, and it has started to make me wonder, how much should I give away on a free blog?

I have written some blogs that look like they give you all the information you need. They don't, they only give you a small amount. For example, a recent blog talked about the callout tool. It might have looked like everything you needed to know was there, but the actual notes I wrote for my subscribers was 70 pages long.

Here is a screen shot of the new free blog proposal.


Here is a screen shot of the same blog, that the subscribers see.  You might notice that the free blogs leaves out a step or two, where the subscriber blog misses out nothing. Every step you need is clearly shown.


So, my question is, am I giving away too much? Or am I not giving away enough?

I would really appreciate comments on this topic.


- Posted using BlogPress

Thursday, November 25, 2010

Vectorworks 2011 – Architect & Renderworks Review by John Helm

Vectorworks 2011 – Architect & Renderworks
Review by John Helm
Architect with Helm & Melacini Architects
www.hm-architects.com


I write this review mostly from a personal level as someone who has been using VW for 15 years or so.  I am an architect so I focus mostly on how it relates to architectural work.

First a few notes about Vectorworks (VW)

Vectorworks is the all-around cad program for architects, landscape architects, civil engineers, mechanical and electrical engineers, theater lighting designers and design in general.  From the standpoint of graphics VW can be a one stop shop, for an architectural office.  It’s a design tool, a production tool and a rendering tool that can also be used for most of the graphic layouts an architect might need.  The learning curve is short and the way of working with it is the way architects work. Design can be done all in 3D and those 3D drawings will be or can be the same drawings that become the 2D drawings making up the production drawing set.  Client presentations can be rendered printouts, animations, walk trough’s, or even real time views of a 3D model taken on one’s laptop to a client meeting.  And if one needs to do a graphic presentation, a competition board for example, pictures, text, 2D and 3D drawings can all be composed and printed right in the program.
                                                        
Vectorworks 2011

I have had the program for a few weeks now and have used it to do one new project and to continue on with a project previously started in version 2010.

Nemetschek the parent company of the Vectorworks program changed the name this year to Nemetschek Vectorworks.  I take that as a good sign; a sign that they really want to identify with it and thus make it the best they can.  In announcing this year’s upgrade they are calling it their biggest ever.  I can’t be a judge of that but it does sound good, and tends to make one think it’s a must have upgrade.  So let’s think about that for a moment.

The biggest bit of news is that they have replaced the rendering engine in Renderworks with CINEMA 4D.  And they have created an easy integration with the actual CINEMA 4D program.  This is a really big improvement especially for anyone wanting to take their models to a very high level.  At the level I work at the major difference I have seen is the speed of rendering.  VW claims a 5 to 7 times increase in speed; I just know it is faster.  One can set several levels of rendering quality for custom Renderworks.  So setting it at the lower levels helps those who have slower computers get a good rendering in a short time.  One problem I have had is that importing from version 2010 windows made with the window tool don’t render.  I had to remake them.  That’s something I think needs fixing.  With yearly upgrades one ought to be able to just install the new program and continue working on older files.   Other than this one problem I haven’t had any other issues importing version 2010 files.

The other big thing is what they call 2D/3D integration.  VW has for a long time been a very flexible program allowing one to create just about any 3d form.  But now with this integration of 2D and 3D the program is even more flexible and easier to use for preliminary design.  I know there are people who design in Sketch Up and import into VW.  Now I think the Sketch Up part can be eliminated.  It’s just as easy to design in VW.  2D objects automatically become 3D as well.  One can use the new push pull tool to stretch objects to whatever size they need to be and then change them interactively.  And there are many other 3D tools that have been added or improved to make working in 3D from the start of a project easier.

I received the full design series gratis to enable me to write this review.  The package arrived with three small books including DVD’s which are for the most part tutorials for each of the main sections: Architect, Spotlight, and Landmark.  They also included a DVD with various movies and descriptions of the new features.  What is missing is a book describing all the features and how to use them.  The tutorials are great for someone learning the program or someone who has the time to go through them.  I was surprised to see that only the Spotlight book talked about the modeling features.  I’m not sure what one gets if one doesn’t buy Spotlight.  I’d like to see an old fashioned book (or at least a cd version of one) for those of us who have to or want to just get to work and read about new features as time permits without having to go through a bunch of lessons.  The built in help feature does make up for this to some extent and so does the included DVD.

I won’t try to describe every new feature.  One can find them on the VW web site.  I will just touch on a few that stood out for me.  I mentioned the push/pull tool -very handy.  Extract planar objects has tons of uses.

For example I made a pretty complex model then my partner asked me to calculate the surface areas of some odd shapes.  I just extracted a polygon from the surfaces then in object info found the area. One can also use this to put hatches on various 3D objects.

The new slab tool, improved automatic sections and 3D wall components takes VW to the next level of BIM.  One can create a realistic slab and it integrates with the walls.  Also the slab can be made automatically just by selecting the perimeter walls and fitted to the inside or outside of them.  Have you ever needed to show a wall with a wainscot or layer of brick on the outside that was not full height?

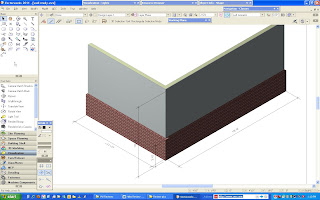
Now you can by adjusting the heights of various wall components.  That is a big time saver.  Here is the reason I have not used the wall tool in the past except in its basic from – two lines filled.  When we do construction drawings we dimension to the outside of the framed wall, not the outside of say a layer of plaster or brick, because those are the dimensions the framer needs to do his layout.  Now one can set the wall control line relative to the core component, that is for example the framed wall.   Both horizontal and vertical dimensions can also be made to show up in a final rendered view.


I like the way they made it easier to access symbols, textures and other resources.  Now there are shortcuts that take one directly to the VW libraries, workgroup or user folders.  No more hunting around each time one needs a new resource.

Another thing I found very useful is the ability to link a camera view to a viewport and to be able to create a viewport of a 3D view directly from the drop down menu.   One can change the camera view right from the viewport.  This is great for making up a sheet with various views of the model in 3D.


I’ve read that there are more than 70 improvements in usability and that many long-time wishes have been addressed.  I can’t write about all of them; in fact I don’t know what they all are.  It’s best if you go to the web site www.vectorworks.net/2011 where you can look at the new features for each product as well as view feature movies.

Do I think this is the must have upgrade?  Yes, I think it is because it really is a leap forward and an improvement in these areas:

3D rendering and presentations using the CINEMA4 rendering engine
Improvements in BIM that make it even more a real BIM program
Integration of 2D and 3D
A big list of 2D design and drafting improvements and time savers

I also say this even though I’m not a big believer in the yearly upgrade idea. If a program does the job, why should one have to repurchase it every year. So, buying the upgrade then depends on what one gets for one’s money.  It seems to be worth it this time.

If you are considering updating or purchasing Vectorworks I would suggest having a look at:
the videos on the VW website, http://www.nemetschek.net/library/index.php
Jonathan Pickup’s website http://www.archoncad.co.nz  and his videos on Youtube http://www.youtube.com/archoncad
and you can have a look at many 3D models I’ve created (done with older versions) on my website www.hm-architects.com.

Tuesday, November 23, 2010

Vectorworks 2011 Transition Course

Are you struggling to get the best from Vectorworks 2011? Maybe you have been using Vectorworks in a way that is not the most productive and you want to change.

I have been asked by several people no if I am planning a course to help users get the best from Vectorworks. The answer is this 4 session transition course. The sessions are 1 hour duration, and there is a maximum of 4 people are each session, so there will be time for interaction.

The course is run over the Internet using gotomeeting. You will be able to see my screen, and I will be able to watch each attendee complete the exercises.

See calendar...

Session 1 – Fundamentals
Tool Sets, Text styles, dimensions, hatches and tiles.
Session 2 – 3D Modeling
Push/pull, extract surface, working planes and planar objects
Session 3 – Architectural Modeling
Doors, windows, walls and slabs
Session 4 – Updating your drawing system
Symbols, batch convert and updating the user folder.

Price: $120.00US


Using Planar Objects in Vectorworks Architect 2011

One of the new techniques in Vectorworks 2011 is planar objects. These objects are easy to make and they can be used to change your presentation techniques. You can now add color and hatching into your 3D models.

To start, create your 3D model using walls, doors, windows and roofs. Just as you would in previous versions of Vectorworks.

Use the extract surface tool from the 3D Model toolset.
Click on the face of a wall, then the enter key to confirm the planar object.

After the object is created, use the Attributes Palette to apply a hatch to  the planar object.

You can do this for all sides of the building and the roof.

I have covered this in detail in my Vectorworks Essentials Tutorial Manual available from Vectorworks.


You can read the full blog here... (you need to be a subscriber to follow this link)

Become a subscriber here...

Monday, November 22, 2010

Introduction to BIM for Vectorworks 2011

I have been asked by several people when I will be having my movie based manuals available for Vectorworks 2011.

The answer is that I have been working on the first of the manuals, the Introduction to BIM for Vectorworks 2011.
This manual covers:
  • Document Set up
  • Drawing Walls
  • Doors and Windows
  • Floors and Slabs
  • Creating Roofs
  • Creating Plan Drawings
  • Annotating Drawings
  • Drawing Details with a 3D Model
  • Drawing Details in 2D
  • Room Finish Schedule
  • Door Schedule
  • Window Schedule
  • Exporting Drawings to PDF
  • Exporting Drawings to IFC


This manual is ideal for any designer getting started with Vectorworks, but able to use basic tools; any designer that would like to change from 2D drawing to the most effective way of drawing in Vectorworks. And the most effective way to get started with BIM in Vectorworks is the Vector-workout Introduction to BIM.

I've had my first feedback now from a customer:
This is good stuff. - Charley

This manual now finished and shipping.
Price: $99.50US


Sunday, November 21, 2010

Creating Superscript Characters with Vectorworks 2011

I've just had a question from one of my clients. He wants to create superscript characters on his Macintosh, the little squared and cubed symbols we add instead of writing sq.ft, or sq.m.  I did find an old youtube movie that I made, this shows you how to make the unusual characters:


But, in Vectorworks 2011, you no longer have to use this method.

Subscribe here...


Friday, November 19, 2010

Working Drawings Handbook by Keith Styles and Andrew Bichard

I often get asked about the structure of working drawings (construction documents). How should they be numbered, what should be shown and so on. Creating a set of working drawings (contract documents) is a very important task. If you get it wrong, you will have trouble and complications on site, and with the client. Get it right, and your drawings will describe the building more accurately, and the contractor will understand your intentions better. You might even have less trouble with the contractor (we all hope).

There is a book that I have used many times when I lived and worked in the UK. I was really happy to see this book is still available and up to date. This book will explain the reasons for accurate and clear drawings, how to create a system that will create the working drawings, and it explains a clear systemized approach using an international system called CI/sfb.

The CI/sfb number system can also be used when setting up your Vectorworks note database and symbol library. I'm a big fan of this numbering system. I learned this system when I was working on very large projects in the UK (£70M+). It is a flexible system, it allows for a huge number of drawings, and it allows teams to work well together.

I strongly recommend this book. I already have my copy.

Thursday, November 18, 2010

Review of Cameramatch for Vectorworks 2011

Review of Cameramatch for Vectorworks 2011
By John Helm
Helm & Melacini Architects
www.hm-architects.com


How’s business?  If it’s good or bad you may want to consider buying this add on for Vectorworks (VW).  If you are busy then it will save you time and if business is not so good then it might just give you an edge up on the competition and help you get more work.

Every project that we architects do has a site. The site might be an empty field or an infill property with existing buildings all around.  It could also be an existing building with work done on the outside or the inside.  These days many of us are designing in 3D creating nifty little models of our work that often just float around in space with no reference to the actual site other than of course the 2D site plan.  Or we may create the site and its surroundings virtually.  But for the client and for the completion of the design process what could be more illustrative than to see the new structure on a photo of the actual site.

This can be done using VW importing a picture and then matching the exact angle/perspective of the picture with a 3D view of the VW model.  It’s not too difficult if we know the exact position of the camera, the angle, the focal length, etc. of the imported picture.  But I can tell you from my own experience that what might not seem too difficult can take hours of messing around and trial and error to get a result that even seems close to reality.  This is assuming you know the details of the imported photo listed above, but what if the client just hands you a picture taken from some random location.

Cameramatch solves all of these problems and once one learns how to use the program the “photo” of the site combined with the model of the proposed project can be accomplished in minutes using just about any random photo not hours.  Time savings on just one of these should more than pay for the $100 cost of the program and from then on it’s just more money in your pocket.

Now I have to admit that I have had a few start-up issues.  The instructions, who wants to read instructions, are detailed and one must read them and fallow them.  One must also be familiar with the base program, which in this case is the latest version of VW.  Cameramatch is also available for earlier versions.  I have been at fault in both cases.  I just got the new version of VW and I don’t really like fallowing instructions.  I know I’m not alone otherwise they wouldn’t have a quick start guide in just about everything we buy these days.


As an example here are before and after photos of a little house we are working on in the Czech Republic.  It’s actually a teardown and rebuild of an existing structure attached to another house.  The photo used was taken at random by the client.  We have not even been to the site.


This was just my second attempt at using the program; so don’t think that it’s the best that can be done with the program.  Go to the site www.panzercad.com and look for some examples done by others to get a better idea of the true potential of the program.

The program, as is VW, is available for both the Mac and the PC.  As with all the latest versions of most software, the more computer power you have the more smoothly the program will work.  Cameramatch and VW are no exceptions they both seem to like my new laptop using Windows 7 with lots of ram a lot better than my older XP PC.  But I am able to get the same result with both computers; it just takes longer on the old one and it gets a bit fussy when it starts to run out of ram.

So the bottom line is that this program provides you with an additional tool that will help you with your design, give your client a true picture of how his project will look on its site when finished and save you time and money.  So buy it; it’s a bargain.

I close with a quote from Matt Panzer and suggest that if you really want to get a good idea of what the program does visit his website; you can also download a free trial version:

“Some CM (CameraMatch) users have made CM part of their normal workflow for every project.  The clients love it because they immediately understand how the design fits into the existing structure or site.  And early stages of the project benefit since the designer only needs to model the proposed parts in detail.”

Monday, November 15, 2010

Essential Manual and 3D Modeling Manual Available for Vectorworks 2011

Great News! Updated versions of my manuals are now available for Vectorworks 2011. I have been working hard on these manuals to make them the best I can for Vectorworks 2011. Many people have made comments to me on these manuals during my online courses, and I have tried hard to keep all the good parts and make them even better.

I'm really proud of these, they are my best yet, and thanks to the people at Nemetschek Vectorworks, they look great as well. Thank you to all the people that helped me; Jeremy, Kathleen, Lisa, Steve, Roger and the others.

The Vectorworks Essential Tutorial Manual is the keystone to learning Vectorworks. I have re-organised this manual so that there is a better flow from knowing nothing about Vectorworks to drawing a simple building. Along the way, you will learn about the important fundamental concepts that make up Vectorworks. You've really got to get these before you can really fly with Vectorworks.
240pp, over 700 illustrations, 95 movies with 2:55:07 running time.
Price $75US


If you want to learn how to create 3D models, this is the manual for you. The new edition has been re-organized to show how to take advantage of the new planar objects in Vectorworks 2011. This manual starts with the basic concepts for 3D modeling, so you gain a full understanding of how to work in 3D. Then you start to use these new skills with projects so you learn how the tools from from one stage to the next.
182pp, over 600 illustrations, 56 movies with 1:59:38 running time.
Price $75US

The manuals still have all the parts that my users have come to expect. The exercises are there, the writing is simple, plain English and the embedded videos are still there, all completely re-made for Vectorworks 2011.

Buy the manuals form your local distributor, or get them here.

Tuesday, November 09, 2010

You Can Use a Camera to Create a Viewport with Vectorworks 2011

One of the new features in Vectorworks 2011 is the ability to use the camera to create a viewport. If you use this technique, you do not need to create a crop object, and you can edit the camera settings after the viewport is made, if you need to change anything. 

Place a camera on the design layer. Remember, the camera becomes part of the viewport (like any crop object).

Use the camera to create a viewport, and place it on a sheet layer.

If the camera view is not the way you want it, you can change it.


    Update the viewport to see the finished results of the changes.


      There is an extended version of this blog on my subscribers web site. You must be a subscriber to follow this link.


      Vectorworks 2011 Rendering, One Bounce or Two?

      I have a room created by a friend of mine, Bill. He has made all the textures, image props and backgrounds. Bill and I have been talking about the Vectorworks rendering. Very often, we use Custom Renderworks to see the scene. Custom Renderworks is very quick, and it has several options.

      Click on each image to enlarge it.

      Here is the first view. This view uses fast Renderworks. It takes just over 4 seconds to render. There are no settings to adjust, but the results are pleasing. 

      Lighting options are set to have no bounce, and no layer lighting. 

      This view uses Custom Renderworks, with all the settings on low, and the same lighting options as before. Rendering time, 5 sec.
      Fast work. 

      This view uses Custom Renderworks, with all the settings on low, but the lighting options have been changed to have Indirect Lighting - 1 bounce. 
      Rendering time 12 sec. 
      A good result. 

      This view uses Custom Renderworks, with all the settings on low, but the lighting options have been changed to have 4 bounces for the Indirect Lighting. 
      Rendering time 16 sec. 
      Even better, and it doesn't take too long. 


      This view uses Final Quality Renderworks, with  the lighting options on 4 bounces. Rendering time 1 min 57 sec. 

      This is the best image, but it takes substantially longer to render. If you are willing to wait, this is the best you can get. Notice the pink color on the floor. This is the light bouncing off the ceiling onto the floor.

      I now have a short course to teach people how to unlock the many custom Renderworks options. For more information click here...

      Saturday, November 06, 2010

      Novedge Webinar - Designing in Landmark 2011

      I attended this webinar with Tamsin Slater, the UK Vectorworks trainer. The webinar is a great introduction to Vectorworks Landmark 2011, and I recommend you watch the video. This is just a short video, because you can't cover everything in a short time.

      See the video here....

      Friday, November 05, 2010

      Intermediate Annotation in Vectorworks - Webinar

      I have 3 webinars (they all cover the same information) coming up on Intermediate annotation.

      There are several annotation tools in Vectorworks. There are the fundamental tools like the text tool, dimensions, and so on. But there are several other tools that you may not use, because you do not know they are there. That’s what this manual is about.

      The callout tool can be used to place a note with an arrow. In its simplest way, you can type in the note you want and have the arrow line go from the  text to the object. But there is more, you can create a database to store notes and use the callout tool to place those notes on the drawing. This is a big advantage; you can create a library of well written and researched note, then use them again and again.

      You can use the callout tool without using a database if you want, but you are losing a lot of power. The callout works really well if you get the text from a database. This allows you to set up database of standard notes that you can use on job after job. You can even set up an office database so that several people can look at the same database and share notes.