Before you can do any sort of complex 3D modelling you have to understand some of the basic 3D modelling concepts. That’s what this workshop is all about, learning the simple 3D stuff that you need to learn in order to make your 3D stuff.
Often when I am teaching I hear people say, “well, I’ll get the 2D stuff under my belt first and then I’ll get into the 3d Stuff”. One of the things that this tells me is that I haven’t explained the way the VectorWorks is designed.
VectorWorks is designed to be a simple 3D modeling package and if you draw buildings using the wall tool then you are drawing 3D information. If you use door and window plug-in objects then you are creating 3D information. If you use the VectorWorks roof tools then you are creating 3D information. These things are created for you as you draw.
If you set up the layers correctly then you get walls at the right height, the roof sits on the walls and you can use the 3D model (which was almost created free of effort) to generate the elevations and sections. VectorWorks is designed to make this easy.
The first part of this manual will cover how to set up the layers correctly to draw the walls, doors and windows.
Layers for 3D Modeling
It’s important to understand how to set a your files to make 3D easy for you. If you use your existing default file it will probably be set up for just 2D use. While this does not stop you creating 3D elements in it. 3D elements can be created in any layer, it would be easier to have your layers set up for 3D work.
However, if you want to create a 3D model then it pays to set up the file at the beginning to accommodate the file. It will make fast and easy to generate the 3D model.
Layers are a horizontal organising method where you can divide your file in to horizontal chunks. These horizontal chunks also have a height and if you set up their heights carefully you can generate your 3D views easily.
 • From the Menu Bar choose
Tools > Organization...
• Double click on a layer to edit it.
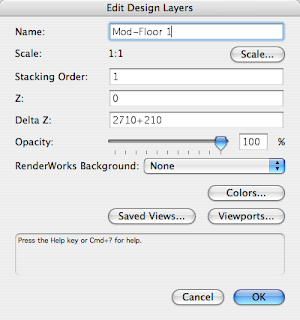
The Edit Design Layers dialog gives you the opportunity to set up your layers with 3D heights. The Z height and the delta Z are the places where you set up the heights of each layer.
The Z for the layer is the project height to the bottom of the layer. The delta Z is the height of the layer, its thickness.
Layers do not have to be stacked neatly on top of each other and more than one layer can occupy the same space. There could be a gap between the layers if you wanted.
3D objects don’t have to stop at the top of the layer, they can go beyond the delta Z height. You could say that the top of the layer is a conceptual top not an actual top.
Using Project Levels for the Layer
You can use the Project Levels (RL) for the setting out of the layers but there are some things that you need to watch out for. When the RL’s are large, say over 20m then when you go to a front view of the building it is so high on the page, you’ll think that it is not there. If the levels are too high the front view will go out of the printable area.
So there is a better way. That is to decide to set one of the FFL’s as z=0 in the Layer Setup. Then all the z heights in the file are relative to this height.
Setting up the Layers
To set up the layers for the project you need to have some idea of the construction and setting out. For example if the construction is 2710 high from the underside of the bottom plate to the topside of the top plate. The floor thickness will depend on the project, depending on the floor joists that you use. For this example the joists are 200x50 with 20mm particle board on top. The construction of the top floor is 2440 from the underside of the bottom plate to the top of the top plate.
On the Organization dialog box the Mod-Level 1 layer will be set up so that it goes from the underside of the bottom plate (top of slab) to the underside of the bottom plate on the Mod-Level 2 (top of the floor). I find it easy to set up the layers from FFL to FFL.
Door and Window Objects
When you place a door, a window or a windoor object, you have the option to put in the height and width of the object. That is you get the change to put in the 3D dimensions of the window or door.
Take advantage of this because it makes it easy to use the model that you are making for elevations and sections.
after you have placed the window or door in the drawing you can edit the 3D portion of the door using the Obj Info palette.
This is an exert from my Short Sharp Training (monthly). Each month subscribers get a manual like this on a range of topics.
This is an exert from my Short Sharp Training (monthly). Each month subscribers get a manual like this on a range of topics. Subscribe here.
The full manual is now available at the Amazon Kindle bookstore. You can view kindle books on your iphone, blackberry, PC and Mac, check it out here.


No comments:
Post a Comment