Pages

Tuesday, December 31, 2013

Introduction to BIM with Vectorworks 2014

BIM stands for Building Information Modeling and it means as well as creating drawings for plans, sections, and elevations, you can draw walls, floors, roofs and other forms in Vectorworks and use these to create live plans, sections and elevations, as well as extracting non-graphic information from the model like a finish schedule, door and window schedule, and other information like wall areas and glass areas.
There is a lot of talk about Building Information Modeling. It is going to be the big thing when using Vectorworks. There are some countries where all jobs will be expected to be delivered using BIM principles.
BIM is not just a new catch phrase, it is also a more efficient way of creating drawings in Vectorworks. At first this doesn't seem faster, because it seems that you have to create a lot of unnecessary information. But it only seems that way because this is a new way of working. When you get more used to BIM, Vectorworks seems fast to create building elements like walls, doors, windows, etc. Then, when you create elevations and sections, most of the work is done. The model is used to create all the drawings. But the powerful part comes when you have to make a change to the building. When you change the design and movie walls, change the roof, etc. you do not have to redraw the elevations and plans. The viewports just need to be updated. This is a great time saver, but more importantly, it manages risk. With BIM there is no opportunity to have different drawings that have different information, all drawings share the same model. If you move a door in the model, every drawing that shows that door will update.
Vectorworks has a concept called stories that will help you to set up your layers. But more than that, stories are powerful at controlling the building elements in the layer. You can make walls, columns, and stairs connect to the floor above. When you change the settings on the story, the elements update automatically. If you setup the file correctly this becomes a powerful BIM workflow. 
I have created a video manual that steps you through the whole BIM process. You will start by understanding the process, how to set up your files, how to use building elements, and how to use the model to create drawings. This is an introduction, so it keeps focused on the basics, because you have to master these to become fast at using them.

Buy now!

Saturday, December 21, 2013

Vectorworks Architct Special Interest User Group December 2013

I have a regular webinar for users of Vectorworks Architect. These are great sessions, they allow the users to ask me, and others that attend, questions. For the past few months we have been looking at a project that has several apartments on a site. This project is taking several session a so that we can look at each part carefully. 

In this month's session we looked at getting the concept drawings set up. Since we already have the apartments on the site, we can use that to get the site plan and site sections. One of the users wanted to see how we could analyse the site cut and fill, so we looked at the site modifiers and we changed them after we had the drawings set up to see the updates.

These sessions are proving to be really popular:
Hi Jonathan,
Thank you again for the BIM SIG yesterday. I really like how this example project is evolving.
 Click here to see the movie... 

Wednesday, December 11, 2013

Setting up Layers and Stories for Buildings in Vectorworks


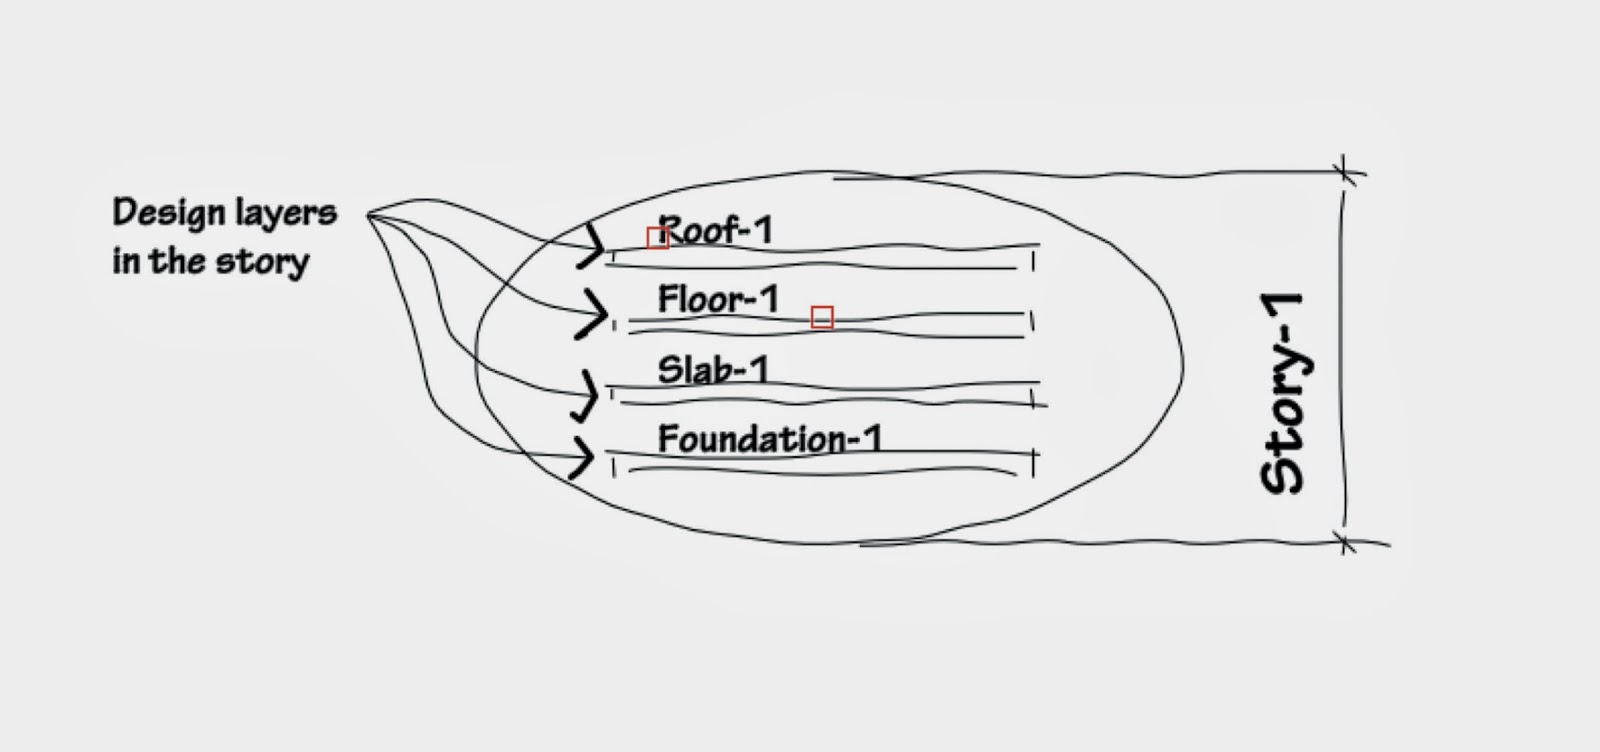
Setting up your layers correctly is essential if you want to use Vectorworks for BIM. Vectorworks from 2012 onwards has an organizing concept called Stories which will require you to think carefully about how you organise your project into layers and stories. It groups design layers to make it easier to adjust the different levels (stories) of a building. The stories also allow you to control building elements such as stairs, walls, and so on.  

What Are Stories?
Stories is a way to control the layers that make up a building, grouping design layers together into levels of the building. They make it easy to adjust the elevations of  all the levels of of the building, because Vectorworks knows how the stories relate to each other. 

You should use Stories to control the elevation heights, design layers for modeling, and classes to control the visibility and graphic style of an object. If you are not familiar with layers and classes, please refer to the Vectorworks Essential Manual, which has a series of exercises to explain these. 
Classes have not changed with the new Stories concept. 

A story is a collection of design layers (foundation, slab, walls, and ceiling, and so on) that make up make up an entire level or floor of a building. The story settings control the elevation of each story relative to the other stories. 


When you have two or more stories, you have two collections of design layers. The story concept is flexible, and you can elect to use several design layers in one story. The settings of each story are relative to each other. When you change the elevation of one story, you can choose to adjust other stories above or below. 

If you have a multi-story building, each story is a collection of design layers. Only work with the absolute minimum of layers in a story.


How do Stories Work With Building Elements?
The real power of stories becomes obvious when you start using stories with building elements such as walls, stairs, and so on. You can link the top boundary to a layer floor above. You can link the bottom boundary to a layer below.  

When you edit the stories, and move the floor above, the objects bounded to layers above will automatically adjust. You have several options for linking the top and bottom boundaries of building elements. Beware, objects on one story do not adjust to (changed) geometry on another story but to the (changed) settings of that story!


Tuesday, December 10, 2013

archoncad webinar for Vectorworks - Wrapping up 2013

At the end of the year we always go through the topics that we have covered in the manuals, and some of the Special Interest Group topics we have covered this year.
This free webinar will be a great way to see what we cover in the archoncad subscription. If you've never been, or not subscribed, this is a great way to see what I do.
I also have a manual with one page for each month, so that you have a short manual that you can look through quickly to see all the topics from this year.
Register here...

Saturday, December 07, 2013

Back to Basics - Editing Exercises with Vectorworks

It is easy to forget these basic techniques unless you practice them. The other day I was helping a client with a complex shape. The shape needed stretching, but when they used the Selection tool, it had the effect of changing the shape. What they really needed was the Reshape tool (refer to the exercise called Stretch).This is why it is so important to keep your basic skills up to date.
In another case, a client was asking about a tool that would remove an unwanted portion of a line back to a boundary object (Trim tool). I have several examples, but they all have the same basis, it is important to keep your basic training up do date.
Often when I see users struggling, they are not struggling so much with the advanced features of Vectorworks, they are often struggling with the basic tools and concepts. That is why we are going to have some back to basics sessions. This manual session is looking at editing tools from the Basic tool set and editing commands from the Modify menu. 
Basic Editing Tools
These exercises are designed to teach you how to use the basic editing tools in Vectorworks. Some people think of these exercises are too simple for them, so they don’t complete them. This is a mistake. These exercises are designed to show you the different options that are available for each tool.

The things you learn in this exercise will be important regardless of what you do in Vectorworks, so it’s important for you to complete these exercises and understand the tools that they cover.

If you don’t use Vectorworks for a little while it’s also useful to come back and repeat these exercises to refresh your memory on how these tools work.

In the manual you get an exercise file that is divided up into a series of layers. Each layer has a series of points on it for carrying out specific exercises and instructions for carrying out the exercise. The instructions are listed below and repeated on the drawings. There is a picture of the tool that you are supposed to use for the exercise.

The exercises are designed to teach you how to draw things in VectorWorks. Each tool that you choose in VectorWorks has options about how you use that tool. The options are shown on the Tool bar. The purpose of these exercises is to get you to use each option (mode) for each tool, and to learn how to use each tool.

When you have completed the instructions on the first layer go to the layer button and choose the next layer down in the list. Do the same for all the layers until you get to the bottom of the layer list.


Eyedropper

This tool is used to copy attributes from an object and apply them to other objects that may or may not be selected. This is a very powerful tool and can be used to copy more than just the graphic attributes.


Select Similar

This tool will select all objects that are similar. This makes it easy to select all of your walls, without accidentally selecting other objects.

When you open the Preferences dialog box from the Tool bar, you will see all the options for choosing how similar objects are. The objects can be similar based on the object type, the class, or a combination of object and class. 
You will notice in this image that there are many more choices besides class and object.
You can also save your favorite settings making it easy to restore them.


Attribute Mapping

The attribute mapping tool can be used to adjust your graphics ( hatches, gradients, etc.) as well as being able to adjust textures and decals.


Reshape Tool

This is one of the most powerful tools that you need to learn and Vectorworks. Not only do you use this tool to reshape polygons, you also use it to reshape all polygon-based objects (plants, roofs, site models, etc.).
Also refer to the exercise called Stretch. It also uses the reshape tool.


Rotate Tool

This tool is used to rotate objects, groups, symbols, etc. Do not use this tool to rotate your view. You can rotate the selected object, or by changing your options in the Tool bar, you can rotate a copy of the selected object.


Subscribe to get the full manual here with 30 exercises and movies 


Thursday, December 05, 2013

Is Other BIM Software Better Than Vectorworks?

I have been reading the Vectorworks tech board recently. Generally this community board is there for users to help each other and mostly it works well for that. There are some visitors to the site that seem to want to complain about Vectorworks. Be careful about believing the opinions on the tech board, sometimes it is like listening to talkback radio, where the opinions have no basis.
The implication is that Vectorworks is faulty and other programs are better. Some of these users even say how they are leaving Vectorworks for some other program. The odd thing is that a few of those people keep turning up to complain. I thought that if they stopped using Vectorworks and went to the other program, they would stop visiting the tech board.
I have been reading about some of these other programs this week. These programs are not without their own issues. I heard of a user that is so unhappy with Vectorworks that he is going to buy another BIM program. He says that it satisfies all his needs, is cheaper, and I guess he also thinks that is has no bugs. I was reading about this software today and there are some real issues with the software. I'm not sure that the user is aware that for finishing off the construction documents and detailing, they will also need AutoCAD LT for the detailing. So, when they leave Vectorworks, they will have to learn two new programs.
Some program's will force an upgrade of the operating system or the hardware needed to run the program at a reasonable speed. If you are thinking of a program that stores the whole model in one file then you also need to invest heavily in the network as well as the computer hardware.
Another user I have heard about wants to buy a different BIM program because of the 3D modeling on the walls and roof, the more powerful doors and windows, and the ability to work in sections and elevations. But when I had a look at this software, it was not able to link walls to the story heights, it had very limited 2D tools, and no automatic working planes. I have heard a lot of users have to use AutoCAD LT to finish off the detailing.
So, while these other programs look like the answer, users find that when they change from Vectorworks and they loose their current libraries and they often have to buy and learn more than one program. Then they find that the abilities of the new program are not as magic as they thought. All the BIM and CAD programs have some areas where other programs are better. The answer is to use your program of choice to the best of its abilities and stop worrying about the other programs.
My Irish friend in London used to say "Faraway hills look greener still.." I couldn't agree more.

Wednesday, December 04, 2013

Back to Basics - Creating Exercises with Vectorworks


It is all very well learning how to customise Vectorworks, learning how to create your own Vectorworks tools, and other cool stuff. If you do not know the basics very well it is a waste of time. It may seem to be tedious that we go over the basics again, but I really feel that revisiting the basics will make your process faster and more productive.

I have a manual that teaches the basic creation tools. The reason for this is that all professional teams make sure that the players know the basics very well. I have been reading about a famous basketball coach who made his players shoot hundreds of shots each day from different parts of the court. If the basketball players are professionals why do they need to practice the basics so much? Well, the answer is that even professional sportsmen need to practice the basics because then the basics become automatic. When the players are under pressure they can carry out the basics automatically because they have been practicing.

Rencently,  I was teaching some highly skilled users. When I used the Select Similar and the Visibility tool they were surprised. Although they had seen the tools, they had never used or thought about using them before.Teaching these uses about these tools created a real spark of interest and they were very happy that the training covered these tools. The users felt that these tools gave them a real increase in productivity.

Often when I see users struggling, they are not struggling so much with the advanced features of Vectorworks, they are often struggling with the basic tools and concepts. That is why we are going to have some back to basics sessions. This manual session is looking at creation tools from the Basic tool set.

Selection Tool

cadmovie942 (you have to be a subscriber to watch the movie)

This is the first tool that you should learn and it is the most useful. This tool is used to select objects so that you can an work with them (copy, edit, modify, etc.). There are several options that go with this tool. Setting these options (modes) to suit your drawing style will make Vectorworks work better for you.
When you are finished using the other creating tools, click on this tool.


Pan Tool


cadmovie943 (you have to be a subscriber to watch the movie)

This tool is used to move the view around the screen. Typically, you would use this tool when you are zoomed in so that you can move the screen across to see the required area.


Zoom Tool

cadmovie944 (you have to be a subscriber to watch the movie)

This tool is used for zooming in or out. Drawing is a lot easier if you adjust the zoom level to clearly see the objects you are creating, editing, or dimensioning.


Text Tool


cadmovie945 (you have to be a subscriber to watch the movie)

This tool is used to create or edit text. If you create drawings without any text, it can be very difficult for others to understand the drawing. Text becomes important to write descriptions of the objects and to create instructions on the drawings.


Introduction to Lines

cadmovie949  (you have to be a subscriber to watch the movie)

Lines can be described by coordinates (X and Y) or they can be described  by length and angle. The coordinates are called Cartesian coordinates and the length and angle are known as Polar coordinates.
The Object Info palette allows you to select in which way you would like to see the coordinates.


This is a sample of the manual that is available in my store. The manual comes with the exercise file so that you can follow the instructions and learn to use the basic tools.