There are two main ways to reshape the top (or bottom) of a wall. The first method uses the 3D Reshape tool, and the second is to use the Fit Walls to Roof... command. If you have Vectorworks architect you can use either, but if you do not, you can only use the first method.
Change to a 3D view.
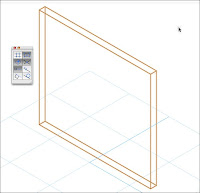
Use the 2D Selection tool to Double click on the wall. You will see several blue handles on the wall.
Vectorworks has selected the 3D Reshape tool for you. Check the Tool Bar. To move the handles (peaks) on a wall, use the first mode.
To add a peak, use the second mode.
to remove a peak, use the third mode.
Move your cursor to the handle at the start of the wall. The cursor will change shape.
Click once.
Move your cursor along the wall to the place you want.
Click once.
Click once on the new peak to create a new peak.
Move your cursor down to make a vertical part on the wall.
Click once to finish.
Click once on the new peak to create a new peak.
Move your cursor across to make a horizontal part on the wall.
Click once to finish.
Click once on the new peak to create a new peak.
Move your cursor up to make a vertical part on the wall.
Click once to finish.
In front view the wall should be the shape you want. The walls are not quite vertical, they are 1mm off vertical, but that’s the best I can get.
 Change to a 3D view.


No comments:
Post a Comment